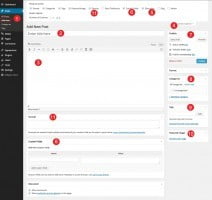
In Wordpress there are pages and posts. Even though they perform different purposes, the same editor is used for both. To write a post click the Post tab in your admin panel and then New Post or roll your mouse over the Post then select Add New (1) and you should be able to see the editor. Now you can fill in the blank spots.
Except for the post title and the main editing box, the rest of the boxes can be opened or closed by using the little arrow to the right of that box. This can be used to unclutter your viewing area and let you concentrate on each box individually.
Description of Fields
Start by giving your post a title (2) using words and/or characters and complete your post content in the main post-editing box that is below it (3). Here you add whatever you want: Text, images or video. You can also copy any text block and paste it here.
Screen Options
There are more fields on the right hand side providing more options. What is visible depends on what has been selected from the Screen Options which is on that opens up by clicking its tab (4). Here you can check mark, which boxes opens up on the right hand side. Some options are unchecked by default and you will have to check the box to display them but once you have made your selection, the options are saved and you won’t have to do this again. You should check the ones you want and uncheck the ones you don’t. One of the most useful one is the Discussion (5) that let you select whether you want to allow comments or not. If this is a page you do not wish to solicit or display comments then you can uncheck its box and the comment module will be removed from that page.
Custom Fields (6) is the next one that can be used most commonly to add Meta title and description by entering seo_title and seo_description in the custom fields.Each custom field has a name and value pair text box so along with the name seo_title you can add the actual title in the next text box to the right of it.
Publishing Box (7)
This box, like the others, can be opened or closed and the small arrow to the right allows you to do the toggling. Click it to close the box or open it. To the right is the Preview button. This is just what it says; pressing it allows you to preview your changes in a new window before publishing it.
Publishing means the post will appear on your website for all to read and is controlled by the blue Publish button in that box.
Save Draft lets you save your post as a draft. This allows you to time to complete the post or make changes to it or for any required approval before publishing it.
The remainder of the box are Status, Visibility, Move to Trash and Publish. They are self explanatory as to what they do and the first three give you the ability to edit the status, Visibility and the publish date.
Visibility also allows you to password protect the post.
Categories (8)are the general topic the post can be classified in. Generally, bloggers have 7-10 categories for their content. Readers can browse specific categories to see all posts in the category. To add a new category, click the “+Add New Category” link in this section. You can manage your categories by going to Administration Panel > Posts > Categories.
Post Tags (9) refers to micro-categories for your blog. Posts with similar tags are linked together when a user clicks one of the tags. Tags have to be enabled with the right code in your theme for them to appear in your post. Add new tags to the post by typing the tag into the box and clicking “Add”.
Featured Image (10) is the old Post Thumbnail and is an image chosen as the representative image for the post or page. The display of the featured image is up to the theme. Most themes support it. After clicking the “Set featured image” link follow the same steps as inserting images in Posts and Pages. Once you have selected the featured image and determined the image settings, click on the blue “Set featured image” button, to set it as the featured image for your page or post.
If you checked the box for Excerpts (11) in the Screen Option, you will see a box below the main editor section. Excerpts are an optional hand crafted summaries of the post content. Excerpts are useful and are used by your theme in different areas of the blog.
IG Webs – Huntsville Web Design Services Get a free quote! Get Small Town Rates
IG Webs, a Huntsville Web design firm is a premier web designer in Huntsville, Alabama known for super client care. You should choose IG Webs if you want personal attention, lower rates and dedication to you. We can respond to you quickly. Client care and service is our top priority and we’re small enough to be able to do just that, yet big enough to meet all your demands. And we do not charge for on page SEO (Search Engine Optimization), we design it in.
See what they say about us. Interested to know how we go about web design? Here’s how. Need more information? Check our FAQ page. Websites are much more than just HTML codes. A website needs to be successful at presenting ideas in an interesting and effective manner with an eye on being found. “Ignorance may be bliss for those who design the website, but that’s seldom the case for those who visit it. ” We work with clients across the nation. Give us a call!
Map of Huntsville, Alabama


